FEATURED POST

50 Places To Catch Fish... Part 3

Showing posts with label foam. Show all posts

Saturday, February 4, 2023

THE FROGGIE - A Tony Spezio Classic

By David Hutton
Palmetto Fly n Fish
Feb 4, 2023


I was fortunate to know Tony Spezio, when I first got into fly tying.
    At that point in time, Tony was well into his Golden Years. But unlike many elderly folks that want nothing to do with "newfangled" things, Tony embraced the modern, including the internet.
He saw the potential in this outlet and in 2015, when I invited him to
join my fledgling Facebook group, "Palmetto Fly 'N Fish," he jumped in.
From there, he took me under his wing for a while. He was a good teacher and an engaging talker, and we corresponded and chatted on the phone frequently. 
    He was getting on in years, but was still generous and welcoming to a nimrod like me. He sent me some materials to use, and it was nice to yuk it up with an old-timer like him.... he was from New Jersey, and it was like talking with my step-dad (himself from NYC).
    As a newbie, that kind of attention from an expert has a long lasting impact. 
    
    Tony was well known in fly fishing circles, as a kind and generous man. You may not know it, but Tony Spezio was kind of big deal in aviation circles, too - he designed a homebuilt aircraft, "The TuHoler," the original of which is still flying!
I knew of it from longtime pilot friend, and great fly tyer himself, Don Schmotzer.(1)

    But, of interest to us, Tony also had a couple of flies to his credit.
One is known as the, "Chili Pepper," a variation on the ubiquitous Wooly Bugger. 
The other is a pattern called, "The Froggie," our subject for today.

    A unique 
frog pattern, crafted from polyethylene foam, "The Froggie" has always been in the back of my mind - and it pretty much just stayed there, kind of forgotten.

A Missed Opportunity, Made Right
    I never did tie, or fish, the Froggie, and after Tony's passing in 2020, I felt ashamed about that.  Considering the kindness he showed me, I should have tied at least a few Froggies. Alas, I did not, and today I can only own up to that misstep. But, I
 was able to rectify that situation recently.

    My opportunity came during a discussion with Harry Glacken, on Gerry Randolph's Facebook page, "Carving Soft Wood and Balsa Bugs and Poppers." (2)
If you are even slightly interested in that topic, I recommend you check out Gerry's group.

    While searching for info on a different pattern under discussion in the group, I was reacquainted with 'The Froggie' in C. Boyd Pfeiffers book. "Tying Warm Water Flies." (3)


Highly recommended book

    Here's what Mr. Pfeiffer had to say about The Froggie:

    "There are lots of ways of working with foam to make frogs and other floating bugs. This is a sinple and effectve way of making frogs of all shapes and sizes.

Tony Spezio began developing this patern in 1993, and it became a classic soon after. This is just another easy way to turn closed cell bfoam into an effectve surface pattern. The basic idea is to tie a strip of the foam at the eye, then to pull it around the hook shank in the horizontal plane to make a flat, surface-riding bug.
    Tony has found it to be great on smallmouth and largemouth bass, as well as large bluegill. He often fishes it as the surface fly in a popper-dropper arrangement. He ties it in this original light yellow foam, as well as white, green, grey, orange, red, and, black." 


    From that same book, here's a good look at The Froggie, as tied by Tony 
Spezio himself....


tied by Tony Spezio

As Pfeiffer says, the fly is dead simple. The materials are familiar, and the tools needed are few.

THE ALL IMPORTANT FOAM

    For his Froggie, Tony Spezio used what he referred to as, "fly foam."
Today, when we mention foam for flies, we inevitably mean
EVA foam (ethylene-vinyl acetate), aka, "craft foam."
    But back in the 1990's, when Tony 
adapted this pattern, well,... I'm sure he meant something else.
    From period pictures, it appears the original foam used was a fine-grain, closed-cell, PE foam (poly-ethylene)... one might think of it as "packing foam" in 2023. Here is an example....


Tony Spezio pic, from Fly Anglers Online (4)

The Funky Froggie - First Attempt
    When I first tried The Froggie, however, I just used a funky piece of "sponge rubber" foam from my junk stash - an open-cell, polyurethane type. 


Funky foam
   
    This stuff was quite literally, junk. It 
helped me get the tying process figured out, but it was old, crumbly, and it absorbed water quickly... the fly sinks after only half a dozen dunkings!
    In retrospect, this might actually be useful. These, "Funky Froggies" (as I now call  them) might be great as near-surface, swimming frog imitations. But, it is not what we are after. 
    Therefore, after some testing, I've switched to EVA foam, sourced from flip-flop sandals.
   
    Yes, I said flip-flops. The cheap, dollar store kind of flip-flops. 
If you have never considered flip-flops for making flies, have a look at this:   The Flip-Flop Popper

 The Flip-Flop Froggie - Second Attempt
    Which leads us to my second attempt at Froggies. I did try a couple types of PE foam from the stash, which I believe is the right idea. But I like the results I got with the flip-flop foam. I'll keep my eyes peeled for some proper PE foam, but will go with flip flop foam for now. 


MATERIALS


    Hook: 3 or 4 X long hook, 4-14

    Thread: Flat waxed nylon, 210 denier or stronger

    Tails: hen neck or saddle hackle.

    Body: Strip of foam, sized for the hook.
    As you can see in the pics, the thickness of the foam is about half the hook gap.
    The width of the strip should be about the same as the hook gap; the wider the foam strip, the wider will be the body.  

    Eyes: Small round head pins.

    Colors: Any color you like
    Colored foam is great for this; I have black, yellow, white, chartruese, orange, blue and more. For decoration, use textured fabric "puffy paint," nail polish, paint, or permanent markers

Additonal Materials, for my Flip-Flop Froggie
Dubbing material
Super Glue

TOOLS


    Aside from the vise, the only tools used were a pair of scissors, some strong thread (210 denier), and a bodkin. Use strong thread - you need it to work with this foam.

Tying notes

1. Apply super glue to the thread at the tie-in points, front and rear
There is nothing to keep the foam from misbehaving, as it is only tied in fore and aft. So give it a little jot of glue at these points. 

2. 
Add a ball of dubbing between the hackle, "legs"
Adding a small ball of dubbing material at the hook bend helps ensure the 
feather "legs" will flare and give good action in the water.

3. Add a ball of material just forward of the legs, if needed.
Another small ball of material just in front of the first one helps the small false legs of the body to spread out. In theory, well-curved hackle feathers make this unneccesary. But, it may help. Dubbing works for this, as does a small tight knot of the same foam being used for the body.

4. Try textured fabric, 'puffy paint" for the eyes. 
Tony used ball-head sewing pins to make eyes for his Froggie, and they look great!
But if you don't have any, try puffy paint by itself. It is easy to apply, and doesn't require an extra fabrication step.

4. Use a wide gap hook
You must keep the hook gap in mind when tying bodied flies; if the body obstructs the hook gap, you risk missing hookups. To take care of that problem, I applied round nose pliers to slightly open up a standard #4 Aberdeen hook. 


THE FUNKY FROGGIE, First Attempt
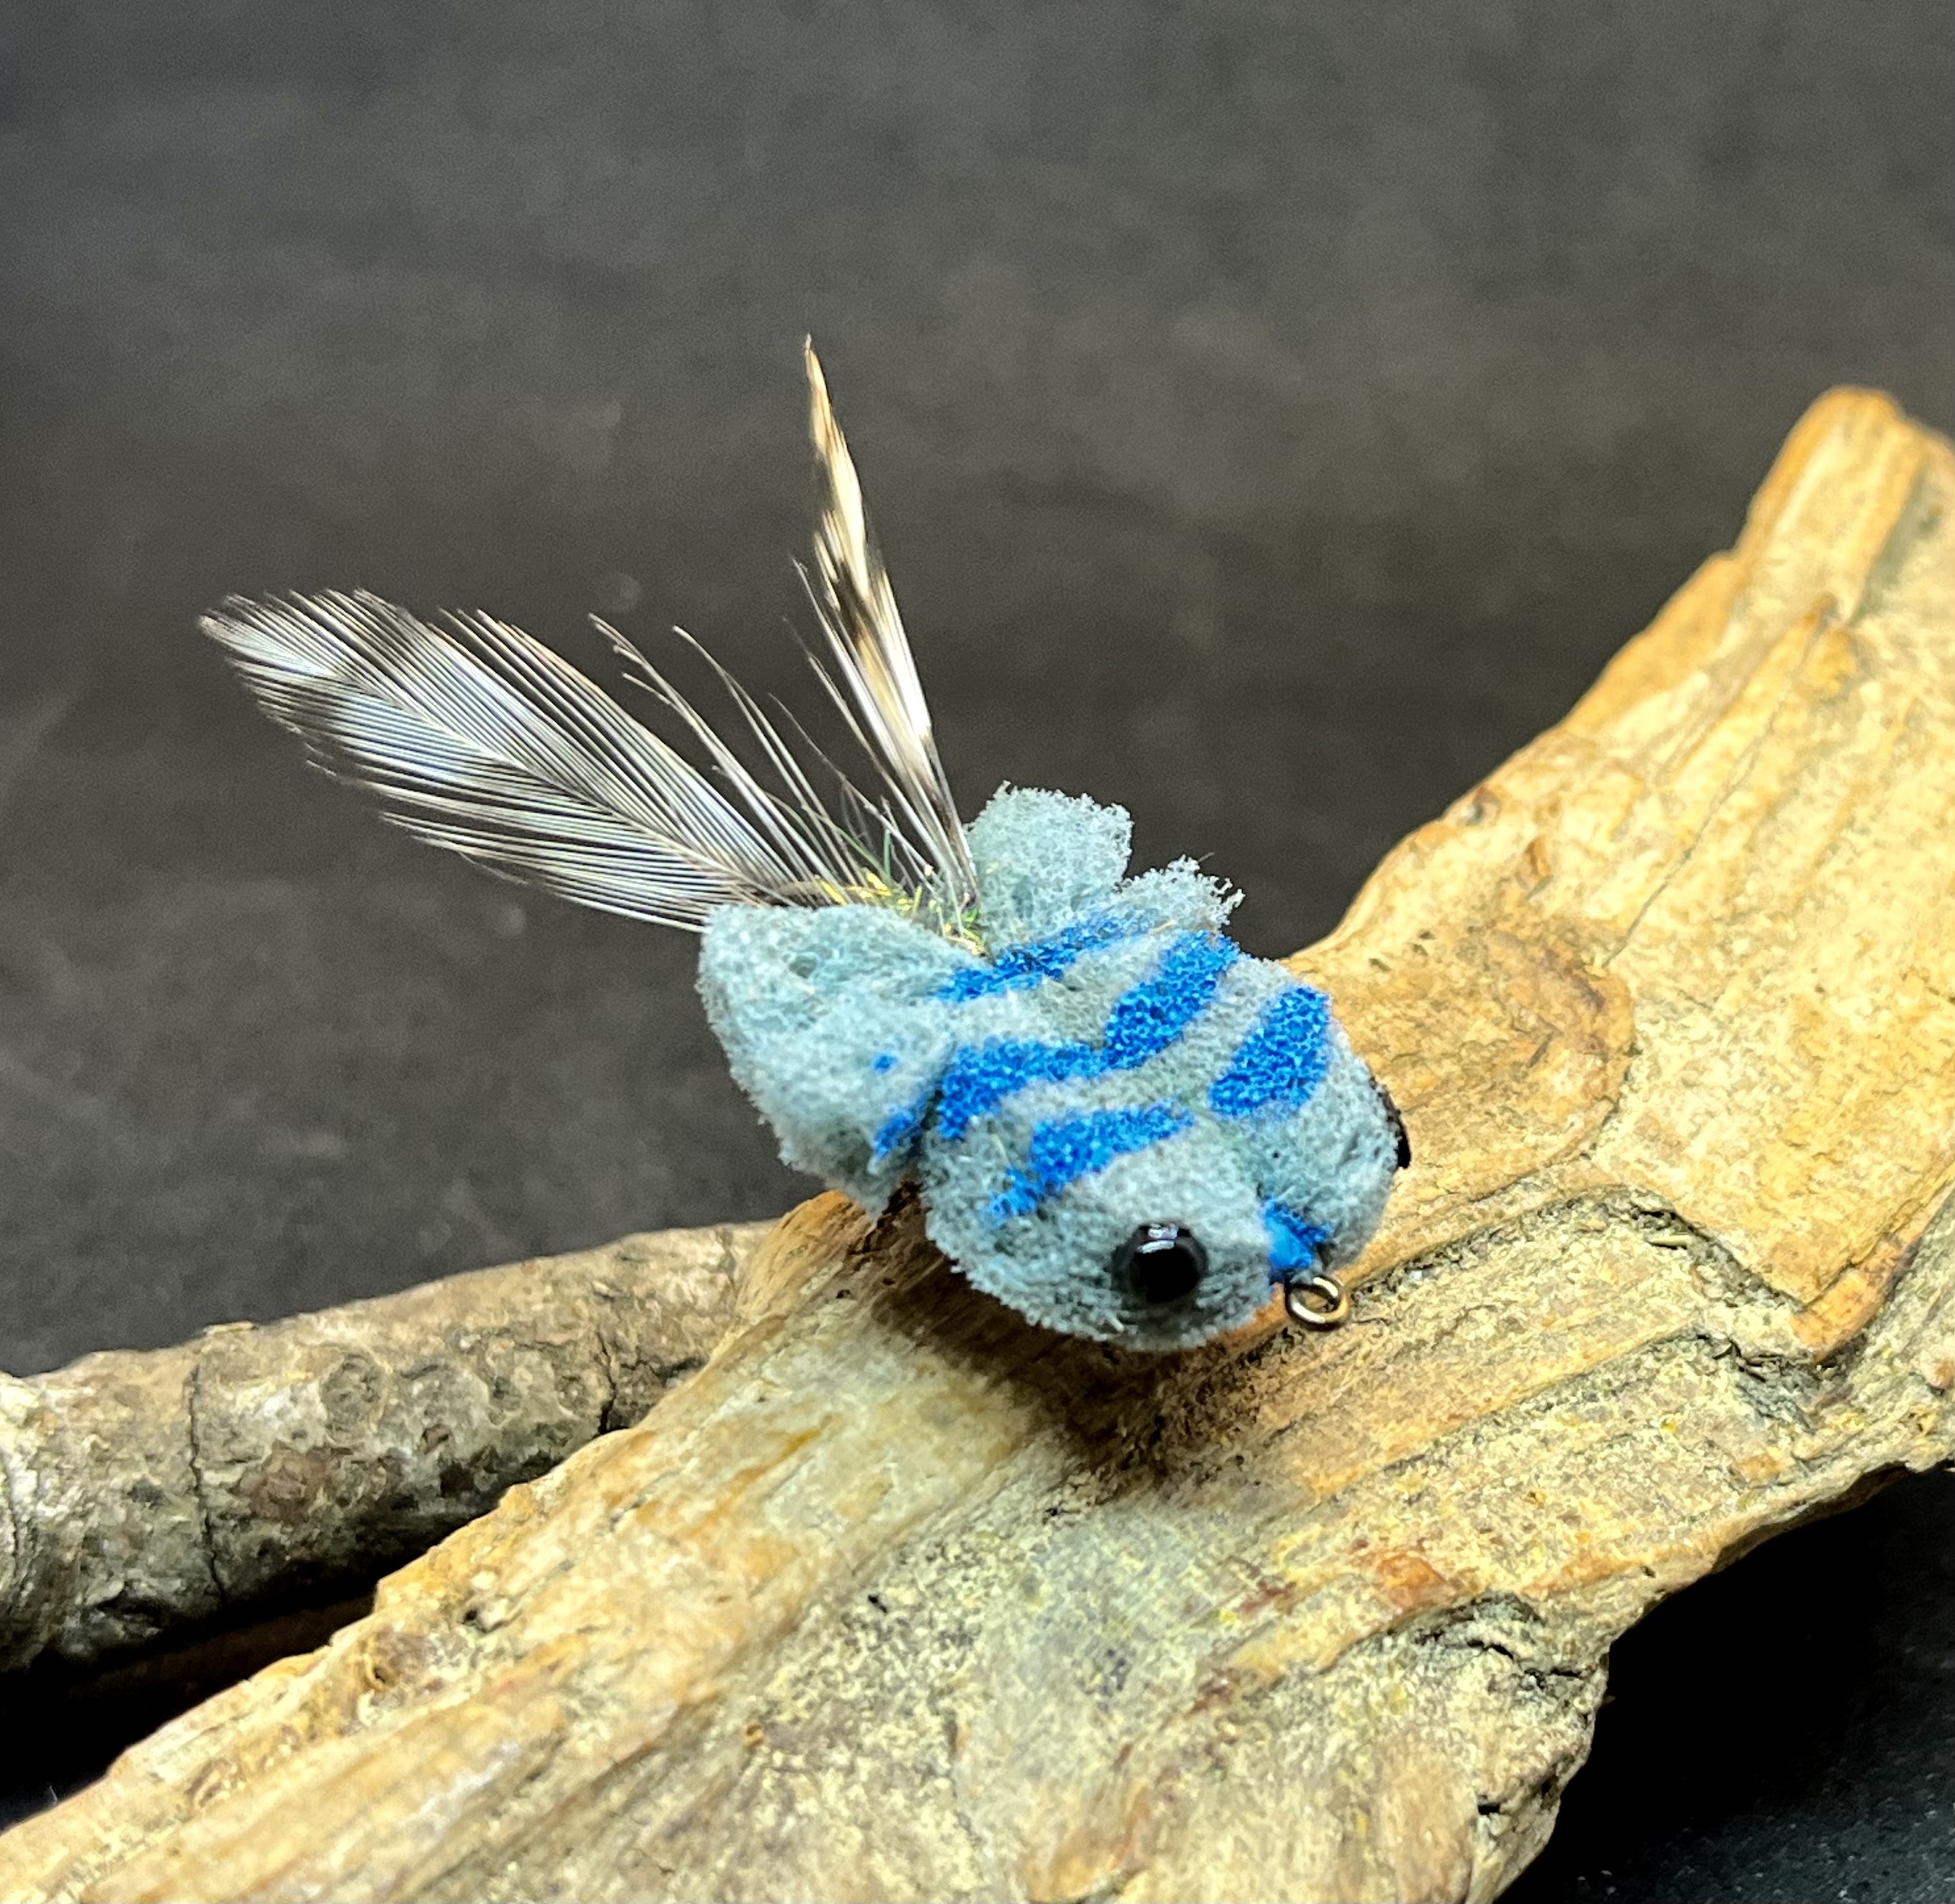


Cute, dont you think? Kind of like a scruffy puppy. 
It also sinks before very long, because of the junk foam I used. 
It could make a decent subsurface fly, though, so that might be a good thing. 
I will test that, eventually.


THE "FLIP-FLOP FROGGIE"


A gaggle of 'Flip-Flop Froggies,' different color combinations


Flip-Flop Froggie - Up Close And Personal

Flies tied by author


After all this time, I finally tied up some Froggies. I hope Tony is somewhere, looking on, and likes them. 
Rest In Peace, Anthony "Tony" Spezio, 1930-2020 


Writers should always strive for a job well done... even mediocre ones like me. So if you found value in this article, please like, comment, and share it. 

Would you like to add the catching pattern(s) seen here to your own fly or tackle box? Do you have questions, gripes, or suggestions?
If so, email me at
...dahutist@gmail.com

If you appreciate a no-drama, no-hype Facebook group, follow this link and come join us at:  
Palmetto Fly n Fish

Thanks so much for reading, and...


Tight Lines,

Dave Hutton

© All rights reserved, David Hutton/Palmetto Fly N Fish 2023 

references

1. https://en.wikipedia.org/wiki/Spezio_Tuholer

2. https://www.facebook.com/groups/3077577939172710  

3. "Tying WarmWater Flies," C. Boyd Pfeiffer (RIP), 2003, Krause Books

4. https://www.flyanglersonline.com/flytying/fotw2/081604fotw.php

© 2023 David Hutton, all rights reserved.
You may electronically copy, save, and print to hard-copy portions of this work for informational, non-commercial, private use only. You may cite portions of this work under fair use guidelines, as outlined in
 Section 107, Copyright Act
Any other use of the material is strictly prohibited without permission.


Sunday, May 8, 2022

THE STEALH BOMBER - A GO-TO PATTERN


 A Fleet of Stealth Bombers

I recently made a post on Palmetto Fly n Fish, talking about Stealth Bombers, again…. Yeah, once again. This is noteworthy, because until a couple years ago, I didn't give this pattern much notice. More like, I didn't give it ANY notice. Nevertheless, fast forward to now and, while I'm no expert Stealth Bomber pilot, I think of them as a must have pattern. Reasons to Have Stealth Bombers So what happened? Why do I like them now? According to Georgia's Kent Edmonds*, the creator of the pattern, the Stealth Bomber is a foam-based derivative of the "Turck’s Tarantula." 
Being a foam diver/slider, it duplicates the Tarantula’s diving motion and the resulting bubble trail made when the fly is stripped hard. * I once met Kent Edmunds, and had no clue who he was. I feel kinda bad about that, now. Sorry, Kent. Okay, fine. But what is special about the Stealth Bomber? Well, the Stealth Bomber..... ... features foam, hair, legs, and flashy stuff. The only thing missing is hackle, I guess, and there's probably some way to work that in, too. Otherwise, the Stealth Bomber has it all.
... floats in the surface film, not above it. This mimics what most real critters do; they float and swim half submerged. Many experts claim this increases hook-ups, and I'll take their word for that. .... marries a slider with a popper....but mostly a slider, since there's no popping face.
.... makes that desirable, but elusive, “quiet noise.” It doesn't 'pop' and 'kersploosh,' so it's less likely to scare away pressured fish. But it dips and dives seductively, which is likely to entice them.
.... leaves a good bubble trail in it's wake. This is a visual thing the result of that big, open foam loop at the rear. Your garden-variety popper doesn't manage this feature all that well.
With all this going for it, how can you go wrong? Looking back... I don't think I’ve ever cast one out, that failed to get attention from the fish. At The Vise The Stealth Bomber is also just enough of a challenge at the vise to be interesting. First off, it requires a precise shape for the foam. To make this shape consistent, you want either a purpose-made cutter, or a template. Either will do the job and allow you to knock out the correct shape, time after time. But, since I'm too cheap to spend $20 apiece for each different size foam cutter, I made a tracing template out of some old countertop micarta. Fortunately, Kent Edmonds makes the template available in .pdf, on his webpage. So that’s a good thing. You download the .pdf, print, and make a tracing template like the one seen below....
Tracing Template, size 6
You can find a link to the templates in the end notes.
What else? Well, the pattern is a bit of busy work, but not overly fiddly. It is a bit complex, too, but only enough to keep you honest and make you pay attention.
The Stealth Bomber is not a fast tie, but not painfully long, either.
And if you screw something up, it’s not a big deal to step backwards and correct it.
Take my word for that.
So, I like to keep in practice tying them. I’ve got them down to size 8, and probably wont go smaller. 
Between 8 and 6, you're right in the zone for bass and panfish.
Variations Unlimited Here's the another good thing about the Stealth Bomber - its flexible. The theme for this session was red…. because the foam I used was red. And people, they like red.
Fish, on the other hand,...well, I don’t think they care much about color.
But people, they like red. However any color will do, as long as you like it. Blue has some appeal to it, in my experience. I believe chartreuse is the most popular color. And certainly the old standards of black, green, white, yellow, orange, all these are bound to have some fans. And why not pink? Or Fire Tiger? Why not indeed?
I included lotsa legs, too, because I’m a leg man. I don't suppose it hurts to make it look "buggy" this way.
As you can see, the variations are probably only limited to what you have available. The construction is standardized, which lends itself to infinite subtle - and not so subtle - variations.
That also suits my FTADD*….. I’ve tied no two Stealth Bombers the same way, twice. Those shown here are no different. They are all within the theme, but each is a variation on the one before. * Fly Tyers Attention Deficit Disorder Fishing Notes This is what Kent says about the fishing the Stealth Bomber The originals were basic, and tied in black. But for bass and big bream, I often tie some in bright color combinations and add flash wings and rubber legs. The "stealth" name hardly applies to their appearance..., but its action can still be quite stealthy. With soft little strips it will wiggle and maybe "bloop" slightly. Strip with a just a little bit more vigor and it will dive and bubble, but still stay in the target zone (the strip here should be very quick, but very short). Give it a longer, harder strip and it will dive hard and create a major commotion. To learn more, go to the links at the end and get the template. It's all there.
So, yeah…. Stealth Bombers. Get you some.
Materials - recommended Hook - sizes 4-10, straight shank Thread - strong, because were working with foam Foam - 2 mm craft foam Tail - bucktail, synthetic poly "hair," Krystal Flash Underbody - dubbing, peacock herl, yarn, etc
Wing - bucktail, synthetic hair, Krystal Flash
Legs - rubber, silicone, stretchy legs - - - - - - - - - - - - - - - - - - - - - - - - Thanks for reading. I hope you liked it, and will share it with your friends. David
Visit Palmetto Fly n Fish, here: https://www.facebook.com/groups/flyfishingsouthcarolina © All rights reserved, 2022 End Notes 1. Kents page about the Stealth Bomber: http://www.flyfishga.com/stealth.htm 2. Downloadable template: http://www.flyfishga.com/The%20Stealth%20Bomber%20Fly.pdf

Monday, March 8, 2021

The Gill Bug - A Bass and Panfish Fly

The Gill Bug
David Hutton, Palmetto Fly N Fish

Mar 8 2021

Simple flies.
I like simple flies. 
Just saying it aloud - “simple flies” - is appealing.
And when I say, "simple," I mean three materials or less, excluding thread and hook.

    No complicated engineering, no laundry list of materials, and no difficult tying gymnastics...that is simple. And that's what we have here today - a simple but very effective pattern for bass and panfish: THE GILL BUG.


------------<~~>------------


Gill Bugs Galore

Origin of pattern
    This pattern was the brainchild of Detroit rod builder, taxidermist and inventor, Paul Young.
    If you were around in the 80's, you'll probably remember a pop musician of the same name, with a few hits back then. Well ...


Sorry - not THAT Paul Young

    Instead, the man I refer to is Paul H. Young, the fly fishing legend...

                                                            
THIS Paul Young

    He built some of the finest fly rods ever, and was among the best of the post-WWII rod crafters...

    His gear and his book, "
Making and Using the Fly and Leader," still bring high prices whenever they come up for sale.
Today, a chapter of Trout Unlimited is named after him.
And he had “firsts”...
- He was the first to take the short, slim fly rod into the mainstream.
- He was the first to promote Mustad's famous barbless hooks, and he invented the famed Strawman Nymph, among others.
- Remember those collapsible, plastic drinking cups? The Trik-Kup? Paul Young invented them, too.

    But Mr. Young was also a keen angler and fly tyer.
Our featured pattern, the Gill Bug, is one of his patterns, albeit a lesser known one. It was created to overcome the main drawback of most bass flies in general:

They're just too dang big and bulky to cast pleasantly without heavy rod and line combos.

    It's understandable that trout anglers, or panfishermen, might not want to invest in an outfit just for this heavy fishing.

    I'm one of them.

    Fortunately for us, Mr. Young gave us the Gill Bug to deal with that. It is lightweight, not overly air resistant, and it floats on the water very well. Best of all, it appeals to bass when they want a surface pattern.

    It was also popular in the not-too-distant past, from what I can learn of it.
    Chauncey Lively wrote glowingly of it in the 60's. That's pretty big, in itself. It had a loyal following in the Northeast, and has been adapted to every size hook imaginable.
It has caught bass, trout, pike, and panfish of all kinds.
Your great grand-dad may have known of it.
    Even so, like so many good, older flies, it has disappeared from the modern fly box... An internet search of the pattern turns up nothing.

    So, dear friends, we are here today to usher in a Gill Bug revival, albeit a small one.
Gimme an, “AMEN,” and lets get into it!


 What It Is And The Materials

    The Gill Bug can loosely be called a moth-type pattern. This idea, a big moth or butterfly as artificial lure started in the late 1800's, and was common through much of the 20th century.
It's logical, I suppose, if a bit fanciful to the modern fly angler.

    To be honest, the idea hasn't survived too well here in the 21
st century. A few older patterns bow to the concept....
There's the old Neversink Skater.
The White Deer Hair Moth, and The Spruce Moth come to mind, too.
And now and then, someone hits on something similar to the Gill Bug... although they never quite get there.  


    But, the "moth fly," or at least the concept, is mostly unloved and just lingers in the corners of fly fishing. Fortunately, bass don't know or care about all that. 
To them, it just looks like something good to eat, and it appeals to our imaginations.
    In the end, both are good enough.


The Tools and Materials

Tools
    The tools used aren't anything unusual – here's the list:
(from L to R in the foto)


Scissors (3)
Bodkin
Hair stacker
Thread holder (bobbin)
Hollow punch (for foam variations)
Hair comb
Super glue
Cement, black
Dubbing
Deer hair
Foam
(not shown - chenille of your choice)

    Serrated deer hair scissors are maybe the most unique tool of the bunch. Everything else is standard stuff.


    For materials, the original Gill Bug uses only chenille and a clump of deer hair.

    Can it be simpler than that?!

    But don't be fooled - under that label of, “simple,” is a bit of magic that may not be obvious. The magic is hair taken from a deer... good ol' deer hair.

                       
    I don't know what it is, but there is just something almost bewitching about deer hair in a fly pattern. Fish just seem to fall for it, like you or I might fall off a log. If I see deer hair in a fly, I'm automatically confident with it.

    Another feature of the deer hair wing on the Gill Bug is its dihedral spread. It is angular, in a “v-shape,” and spreads up and back, above the body and hook.
    Dihedral is the same aerodynamic principle that helps model aircraft fly right side up, and in the Gill Bug, it allows the thing to land on the water in the proper orientation

                                       
                                        Wing dihedral


Gill Bug Dihedral

    The deer hair in the Gill Bug can be coarse, and this actually works best in the larger sizes. To get an idea of the quantity of deer hair used, you want enough deer hair to pinch solidly between thumb and the first two fingers, for a #4 hook.

    For thread, you want something strong to bind the deer hair to the hook - I suggest something along the lines of 6/0, 210 Denier, etc. A little cement during construction can't go wrong, either.

    Hook sizes for bass are in the #6-#4 range, and they should be relatively light, but long enough to give you a decent body length. I like an Aberdeen, but anything along these lines is good. Just not too heavy; the Gill Bug is intended to be worked as a surface pattern.

    The chenille is your choice. I left it out of the materials foto above, because I immediately started looking for alternatives.
But the original pattern from Mr. Young used two strands of chenille in alternating bands - black and orange.

I've also seen reference to them in black and white.
Other good colors are white with natural deer hair, and yellow body/black hair.

Variations, Sizes

    You can, of course, tie the Gill Bug in sizes more in keeping with its name sake...bluegill sized, in other words. It makes a dandy panfish bug.
    For smaller fish like bluegill, hook sizes #6-#12 would be right. For these, finer deer hair is called for, simply to maintain proper proportions overall.

    An interesting variation is to tie the your Gill Bugs inverted, with the hook point up. This way, when it comes gliding down on that V-wing, it will land with the hook point out of the water. This is good for fishing in lily pads, where you can gently walk the Gill Bug across the top of the lily pads, until open water is reached.


Upside Down - gotta work on that head

    Probably the coolest adaptation I've found for the Gill Bug is to make the body out of foam.
    The original chenille had to be well greased with fly floatant and will become water logged, eventually. But not EVA craft foam!

    The foam can be applied as wound-on strips, or my favorite, as a disc, folded around the shank, taco-fashion. This method came from Harrison Steeves III. You can see a couple II did with these foam discs in the opening foto; a dot of super glue holds them together.

Fishing notes
    The time honored way to fish a “moth fly” is to skitter, or skate it across the waters surface. 

    You either grease them and the leader well, or use foam and a greased leader, so everything floats high on the water. Then, pick up the rod tip, like you're going to start a back cast, and once it starts moving – you twitch the bug across the surface in a waking, skipping kind of retrieve.
    Waggling your wrist at the same time can make the fly dance a little on the surface, another way to make it work its magic. The big scoop-shaped head is there to help the fly scoot up out of the water a little better.

    Both of these techniques work best without having too much line out...,
 
if it is too long, the line drags the fly and reduces the control you might have over the Gill Bug.

    But after a little experimentation, you'll get the hang of it, and you're in for tons of fun..., and the bass should find it irresistible.

    Regardless of whether you use chenille or foam for the body, don't skimp on the floatant. You want the fly barely in the surface film, to pull off these antics.

    Of course you can also just fish the Gill Bug like a regular surface fly, without all the gyrations. It is 
a good surface fly, just a quiet mover, and will work just fine to get the fish's attention..., and the magic deer hair will lure them in for the take.

But no matter how you fish it, Paul Young's 'Gill Bug' is due for a revival.

------------<~~>-----------

Writers should always strive for a job well done... especially mediocre writers like me. If you found value in this article, please like, comment, and share it. 

Do you want to add the catching flies seen here to your own fly or tackle box? Do you have questions, compliments, or suggestions?
If so, email me at
...dahutist@gmail.com

If you appreciate a no-drama, no-hype Facebook group, follow this link and come join us at: 

Palmetto Fly n Fish

Thanks so much for reading, and...


Tight Lines,

Dave Hutton

© All rights reserved, David Hutton/Palmetto Fly N Fish 2021/2023 


Tuesday, May 29, 2018

THE FLIEDERMOUSE


The Fliedermouse 

    
I don't normally fish topwater flies as my primary type. 
There, I said it. Clap me in irons, sharpen the guillotine.

    I tend to view fly fishing as a shallow water style, and top-water flies are a natural. So don't be concerned by that opening statement - I like shallow water floating flies, bugs, and poppers. There is nothing as exciting as that splashy 
surface bite. 
    Yessir, surface patterns have their place and I usually start any session by fishing the surface. 
    
    But there is an inherent problem with surface flies that is almost never mentioned: They are useful only part of the time. 
    When the sun gets high, or the wind turns sharp and brisk, they start to be ignored. Or, for whatever reason known only to the fish, they just won't come up to take a surface offering.
    At those times, I start probing down in the water column.
Many fly anglers simply won't fish anything BUT a surface fly or bug.... but I'm not one of them. 
    So I'm in two minds - I know there is a time to let go of the surface fly and fish down in the water. But I also like floating foam patterns, and I really like imaginative "creature" flies. 
    Some would say I'm conflicted; but I say, "Not at all."
I call it smart... or maybe realistic. Maybe both.
    And with that understood, I feel safe in saying that I have been taken with this particular foam-and-hair surface bug.

THE FLIEGERMOUSE ... What's In A Name?
    The name of this fly, "Fliedermouse," is a clever play on words, something I also like. The word, "flieger," in German means flyer. There also used to be a popular old pattern called the "Fledermaus" - German for "bat."
    This one borrows from these ideas and mixes them all into... "The Fliedermouse." 
The "Flying Mouse," if you like.

    This pattern comes from Harrison Steeve III's book, "Tying Flies with Foam, Fur, and Feathers." 


    If you like terrestrial flies and tying with foam, it is a must have for your library.


Rear Quarter View

A UNIQUE APPROACH
    Harrison developed a concept using craft foam discs as the base material for any number of flies, and this is simply that: several foam discs of different sizes, affixed in imaginative ways to the hook. 

    Added to the Fliedermouse is another favorite material of mine - deer hair. In this case, if forms a durable tail and wings.
As far as I'm concerned..., "Deer hair is fish-catching magic!"
You can quote me on that.

    The tail is deer hair tied on the hook shank in the usual way for a tail. I tie it in tight, but not too tight that it flares widely. The body is a disc of foam, folded up and around the hook, taco-style, so it surrounds the butts of the deer-hair tail.
Super glue holds it closed.

    The shoulders and head are another two discs.
One is pinched to a tiny point, then tied just in front of the body to form the shoulder. A jot of super glue holds it tight to the front of the body 
    Next comes two tufts of deer hair, one each tied to either side to form wings.
The last item to go on is another disc, pinched and tied in at the eye, forming the head shell. Here again, a little more super glue holds one atop the other, keeping the hair wing under control.
    Some fur dubbing, or peacock herl, blends the bottom of the what is now a thorax into a whole.

You end up with a foam surface bug having a combination effect:

Part waking slider
Part hair fly
Part critter

NOTE: Fliedermouse is a two material fly, but don't let that fool you  - it is not a "quickie," 
simple tie. It requires some dedicated material prep, a couple of tricky bindings, skillful thread tension control, and the winging work of a "Humpy" trout fly.
    If you like 2 step patterns, this may not be for you.
    But, it's not terribly difficult, either. If you have other foam and fur patterns under your belt, and aren't raw beginner,... you should give it a go. If you run into trouble, just contact me at the email below and I'll help you over the rough spots.
My suggestion? Tie the first ones big, to get the hang of it.


Bottom View

FISHING NOTES
    Let me be up front here....
    I want to tell you The 
Fliedermouse has caught every species of fish, from Ankara to Zanzibar. 
I'd love to tell you how bass and bluegill leap from the water to grab them. 

    Well,.... I have only fished them in my local warm water lakes and ponds. I have trolled them over submerged weeds. They have been cast in among rocks, docks, wood and weeds in my float tube stomping grounds.
    The fish always react positively, however, and the Fliedermouse gets bit readily. 
So at this point, I can say it works, and has great universal potential. 

    My suggestion is to tie it in the #6 hook range, on a fairly long hook 3X, 4X that hind of thing. I use Aberdeens.
This way, they cast handily, and appeal to both bass and panfish.*
Then, fish the heck outta the thing.

* This size range is known as the Bass-Bluegill Lap and is covered here, by Skip Morris:
The Bass-Bluegill Lap


    Add The Fliedermouse to your kit as a complement to poppers, when something more subtle is called for.
You may find the fish will like them better. 

Or just maybe, you will.


I hope you liked this, and learned something from it. I have  no idea how to make money at this article writing , so I go for a job well done. If you think I did that, please like and share. 

Thanks for reading, and "Tight Lines!"

David Hutton 

If you have questions, you are invited to send them by email to... dahutist@gmail.com
And don't forget to subscribe, leave a comment, and join us on Facebook, here: 
Palmetto Fly N Fish

All rights reserved, Palmetto Fly N Fish© 2018, 2023