David Hutton, © Palmetto Fly n Fish


Here you see the layout diagram for the template.
At the upper left is the basic pattern, enlarged. This can be scaled to any size needed to match the hook.
Bottom right is the template model scaled down to create the lures seen in this post.
In the center bottom is a rounded version inspired by the shape of a guitar pick!
Once you get the hang of how the shapes work, you can get creative with the templates, as long as you retain the basic proportions for your hook.

Another look at the thing, this time the basic cut-out body form with the crucial dimensions and lines drawn in. Thanks to Dron Lee at Fly Tying Nation.


In this pic, you can see the belly of the fly, and the fused edges of the rear body portion.
Fused?
Yes - fused.
The tail of the foam is folded over a bamboo skewer, so its edges meet, and then these edges are fused together with the flame from cigarette lighter.
Literally melted, and fused together by squeezing them between your fingers.
But don’t let that flame linger along the foams edge, or you'll catch it on fire.... half a second is too much. It really takes very little heat.
But ... it melts the foam just enough to fuse the edges together.
Once fused, a little super glue can be dripped down into the joint, for good measure. The original used epoxy, but super glue is much faster, and creates a strong bond.
At this stage, you have the body and tail complete. You can now think of it as a separate component part of the fly.
Decorating it is easy, and you can put together as many of these as you might want to keep on hand. This is a good idea if you expect to make them your go-to surface pattern, or if you will be producing them in quantity.
From this point onward, the fly consists of dressing the hook, assembling the components, and finishing off.
Next comes part 2, where we delve into those parts of the project, add some tips, and give you links to Mr. Dron Lee’s pages to assist you in making your own.


You've probably heard that Necessity is the Mother of Invention.
But, Innovation is what builds from there.
We fulfill a need with invention, then we adapt and improve on that - and that's Innovation.
Todays fly builds on that kind of innovation.
The origins of the pattern come from Joe Blados, and his famous, "Crease Fly."
In his book, “Innovative Saltwater Flies,” Blados said that making balsa poppers was time-consuming, and left his house full of dust — which made his wife unhappy.
So, necessity drove him to ultimately hit on the idea of using sheet foam, folded over a hook, with the sides glued together. This "creased" fly is a lot less bother to make than balsa, cork, or Styrofoam flies.
Today, the Crease Fly is perhaps the top surface fly for saltwater.
It’s also very popular for bass, and stripers.
Well….good ideas lead to innovation, and the Crease Fly has been adapted to other uses.
I’ve seen panfish versions, and we have the subject of this post - a variation from Japan, called, the “Yusaku Crease Fly.”
This comes from Mr. Dron Lee of Malaysia, so many thanks to him for putting it out there.
WARNING: This fly is not just a few feathers and some fuzzy stuff on a hook.
It combines engineering, layout work, pre-planning, vision, and both crafty and natural materials to complete.
The net effect is what you want - a lure that attracts fish to strike.
But it is as much a challenging craft project as it is fly tying.
So if you're game, lets get into it.
The Hook
The entire thing hinges on the hook. More specifically, we are concerned with...
- The hook length
- The hook weight
Many hooks will work, but the shank length from eye to the bend dictates the size of the head, and where the body section is to be attached.
There must be sufficient length to accommodate both features.
Second, the weight of the hook acts as ballast to "keel" the fly and make it float upright in the water. This normally means a hook with heavy wire construction.
Your average baitholder hook is about right. I don't know every kind of hook or who makes them, so I use Eagle Claw baitholder or plain shank hooks for this.
If you know an equivalent hook, great! Use that - and tell me.
But for now, keep that image in your mind.
The Foam
The foam used is either 2 or 3mm EVA craft foam.
This, too is determined by the hook size. The larger the hook, the thicker the foam.
The foam used here is standard craft foam from any number of sources.
You can get it at a fly shop, or a craft/art/hobby store.
Very basic colors are sold at Walmart.
Many children's projects and toys are also made from the foam.
Once you start looking for it, you'll find this foam is everywhere - holiday decorations are another great source!
It doesn't really matter where you get it, though... you just want its thickness proportional to the hook size and weight.
The Template
Once you have the hook and foam selected, the body must be cut from the foam.
This requires some kind of template or shaped cutter, as you want to standardize, both for appearance and ease of manufacture.
A cutter is nice, because it ensures repeatable precision.
But you'd have to make it yourself - I have not seen any pre-made cutters for this pattern.
For the standard Crease Flies - yes.
For The Yusaku Crease Fly? No.
Making a cutter is also a huge pain in the butt, and they all go dull eventually. For these reasons, it is just simpler to make a tracing template.
Here is the template I made:

This template is cut out of countertop micarta. This material was scavenged some years ago, and is ideal for this. It is rigid, but not brittle, and it can be worked with common hand tools.
The key dimensions are drawn out on the template, and you can see those as a centerline, a perpendicular line marking the rear of the head, and especially, the rounded cut-outs for what will become the gills.
In the picture above, these have been transferred onto blue foam for cutting ease.

At the upper left is the basic pattern, enlarged. This can be scaled to any size needed to match the hook.
Bottom right is the template model scaled down to create the lures seen in this post.
In the center bottom is a rounded version inspired by the shape of a guitar pick!
Once you get the hang of how the shapes work, you can get creative with the templates, as long as you retain the basic proportions for your hook.
Another look at the thing, this time the basic cut-out body form with the crucial dimensions and lines drawn in. Thanks to Dron Lee at Fly Tying Nation.

The template makes the necessary shape, and careful, precise cutting turns it into the recognizable form.
That’s what you see here.
The bat shaped portion will be folded over at the end of tying to become the head and gills.
The tail is bucktail and flash, and made as a separate item.
I tie these materials onto a toothpick mandrill, and then they are inserted in the tail end. This is then held in place with either super glue or E6000 adhesive.
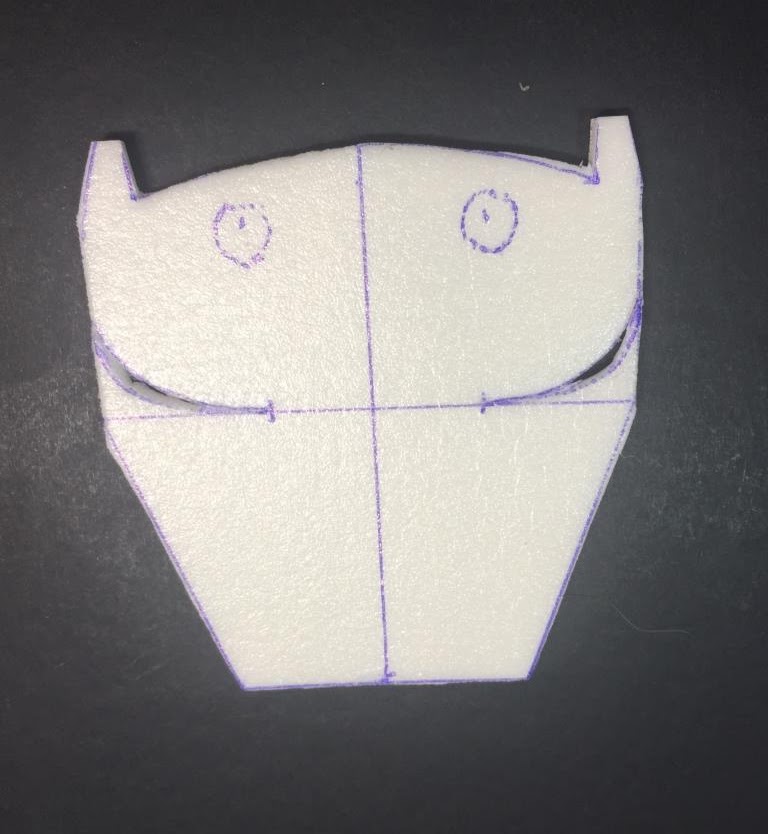
The head has had two yellow dots placed on it where the eyes will be.

In this pic, you can see the belly of the fly, and the fused edges of the rear body portion.
Fused?
Yes - fused.
The tail of the foam is folded over a bamboo skewer, so its edges meet, and then these edges are fused together with the flame from cigarette lighter.
Literally melted, and fused together by squeezing them between your fingers.
But don’t let that flame linger along the foams edge, or you'll catch it on fire.... half a second is too much. It really takes very little heat.
But ... it melts the foam just enough to fuse the edges together.
At this stage, you have the body and tail complete. You can now think of it as a separate component part of the fly.
Decorating it is easy, and you can put together as many of these as you might want to keep on hand. This is a good idea if you expect to make them your go-to surface pattern, or if you will be producing them in quantity.
From this point onward, the fly consists of dressing the hook, assembling the components, and finishing off.
Next comes part 2, where we delve into those parts of the project, add some tips, and give you links to Mr. Dron Lee’s pages to assist you in making your own.
It’s all waiting for you in part 2…
Thanks for reading, and I hope you learned something from this. If you enjoyed it, a like and share is appreciated.
Tight Lines,
David
Palmetto Fly n Fish
©2022 All rights reserved
David
Palmetto Fly n Fish
©2022 All rights reserved