HOW ABOUT A HARES MASK?
The Macabre Meets Fly Fishing
David Hutton, 2018©
I'm a big fan of natural fly tying materials.
Peacock herl, bucktail, hackle... all of these, and more, are the stuff I like best. Truth be told, the 'hares mask' is probably on any Top 10 of natural tying materials, and I've known that for a long time.
So, in August of 2017, I figured it was time to take the plunge.
What The Heck Is A Hares Mask?
For those who have heard the term, but may not know what it is, a “hare's mask” is the actual skin and ears of a rabbits face.

Yes, Virginia, somewhere, someone peels the skin off rabbits' faces and cures them for fly tying. The result is called the "mask."
And while a bit shocking at first meeting, there is a good reason for these things: there are few (if any) synthetic materials that offer the spiky, translucent dubbing obtained from a bunny's face.
The fly bodies tied from this dubbing are said to nearly glow under water. Some flies are created specifically to take advantage of that; the Hares Ear Nymph and its variations come to mind.
This is the stuff serious fly anglers live for.
What Is It Like?
Imagine a flat piece of rock hard jerky, with hair, ears, and vacant little eyes staring up at you, and you get the idea.
Imagine a flat piece of rock hard jerky, with hair, ears, and vacant little eyes staring up at you, and you get the idea.
Bang it on the table for a satisfying “whack!”
Toss it at the cat like a Frisbee.
Poke your fingers through the eye holes and make Pee Wee Herman voices.
Yeah, it's kinda weird at first.
Once you get over the oddity of handling the peeled, dried skin from a rabbits face, you then wonder what to do with the thing.
Just how do you go about turning this macabre material into a trout fly, par excellence?
Problems and Solutions
Well, from what I've learned, it seems a lot of people go about it all wrong. Most will take a little brownish hair, snip off a bit of the spiky guard hairs from the ear, or nip off the furry stuff from the cheeks... and the rest is wastefully ignored.
Well, from what I've learned, it seems a lot of people go about it all wrong. Most will take a little brownish hair, snip off a bit of the spiky guard hairs from the ear, or nip off the furry stuff from the cheeks... and the rest is wastefully ignored.
Eventually, the thing gets tossed; its now pockmarked with little hair divots.
The problem with this is that the masks, natural or dyed, vary widely in shade and texture.
Even from rabbit to rabbit in the same litter, this variation exists. It is the one shared fault of all natural materials.
Now, if you only want to tie one or two flies at a time, this is probably not a big deal.
But if you want to maintain color fidelity across many flies, say in a production scheme, this “face picking” makes it nearly impossible to get consistency.
You don't see that with synthetics, which is part of their appeal. They are the same from batch to batch, for the most part.
Natural materials, well... not so much.
But, there is a simple process that allows you to get nearly all the hair from the mask with little waste, and create a uniform blend of dubbing in the bargain.
Here’s how I did it.
Materials
1. A hare’s mask
2. Wide mouth jar with lid (I used a pickle jar)
3. Small wire brush
4. Heavy fly tying scissors
5. Strainer (I used a piece of vinyl window screen)
6. Towels, both paper and cloth,
1. A hare’s mask
2. Wide mouth jar with lid (I used a pickle jar)
3. Small wire brush
4. Heavy fly tying scissors
5. Strainer (I used a piece of vinyl window screen)
6. Towels, both paper and cloth,
Step 1. Remove the whiskers
Using heavy fly tying scissors, clip the whiskers from the hare’s mask and save them for mayfly tails.
Using heavy fly tying scissors, clip the whiskers from the hare’s mask and save them for mayfly tails.
Surprisingly, there are a lot of whiskers on a rabbits face. And after nipping off the bunny whiskers, put them where you won't forget about them.
Then, when you want to tie up long tailed mayflies, pull out the whiskers and put them to use.
I mean, who doesn't want to tie rabbit whiskered mayflies?
I mean, who doesn't want to tie rabbit whiskered mayflies?
Step 2. Clip the hair from the mask.
This is the tedious part.
This is the tedious part.
A hare's mask isn't any bigger than your two joined hands, but it seems to take forever to remove the hair.
There is a lot more than you think.
There is a lot more than you think.
Its like eating raccoon; you can do it, but you gotta keep at it.
It took me an honest hour to get it done.
It took me an honest hour to get it done.
And since it's a hair clipping exercise, it's kinda messy. This is best done over a large tray of some kind; I used a big, multi-compartment box – one of those hefty Plano jobs.
And Im glad I did... I sneezed once from all the hair, and it kept the hair from going all over.
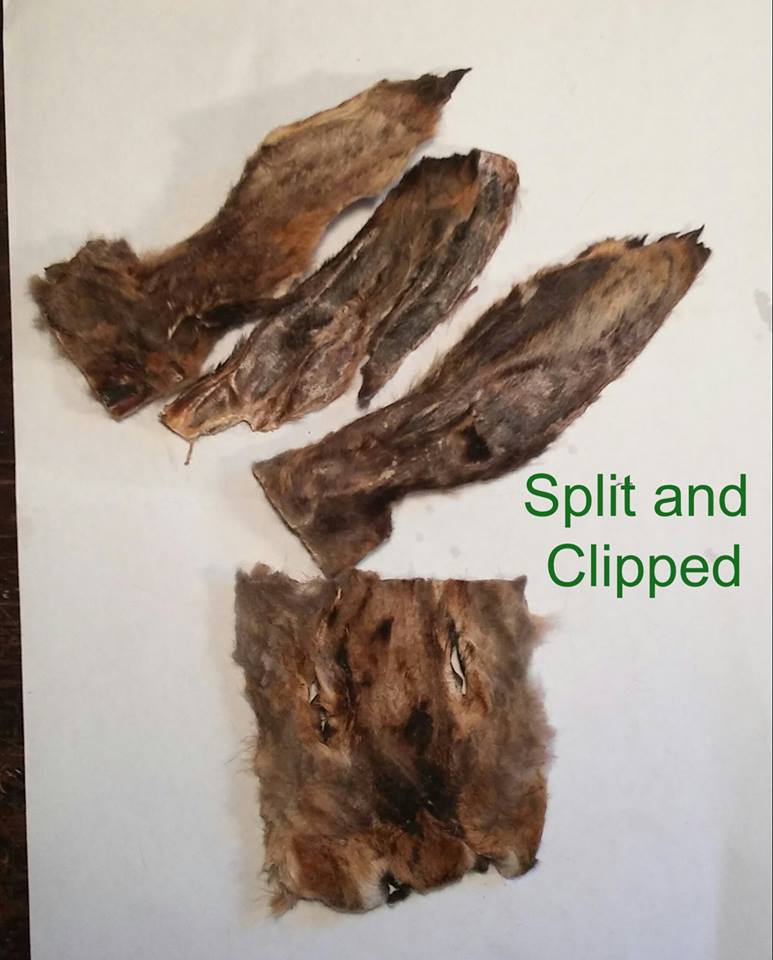
The ears stick up, too, and get in the way of the process, so I cut them off and handled them as separate features. The ears are as stiff as the rest of thing, so I cut the ears along their length and split them open to get at all the little hairs.
To remove the hair, use a wire brush to scrub against the grain and stand it up, then go at it with the scissors.
Just catch the short hairs beneath the scissors and trim away, right down to the skin. You'll get the guard hairs, the soft underfur, and the occasional bit of skin.
Scrub with the brush, and do it again.
I've heard that some people shave the mask and ears with a single edge razor blade, but the skin is too bumpy and uneven for that. You're just as likely to cut down into the hide and hang up the whole thing this way.
I tried the mustache trimmer on my electric razor, too, but that was a total bust.
The scissors get it close enough to the skin with almost no waste, so that's what I suggest.
Step 3. Pile It Up

Once you've taken as much hair and fur as possible from the mask, scrape it all into a pile on the tray.
Hey, that isn't so bad after all. Lets go tie some flies!
Sorry, no.
Don't relax, just yet.
Step 4. Wash It Up
Next, fill the jar about 2/3 of the way with warm water, then mix in a few drops of mild soap.
Next, fill the jar about 2/3 of the way with warm water, then mix in a few drops of mild soap.
The soap removes the natural oils and other contaminants that may remain from the processing of the mask.
Okay - are you ready?
Add the clipped hair to the jar, screw on the lid and shake for several minutes... 5 minutes isn't too long.
Once mixed, set the thing aside while you figure out what to do with the naked, rock-hard hide of a shaven rabbit face.
I still haven't decided; the dang thing is sitting there looking at me as I write this.
I still haven't decided; the dang thing is sitting there looking at me as I write this.
Step 5. Dump And Drain
Once the suds in the jar have dissipated, pour the contents of the jar into a strainer and rinse with warm water.
Once the suds in the jar have dissipated, pour the contents of the jar into a strainer and rinse with warm water.
Allow to drain.
I used the window screen because it was super easy to press out excess water. Just fold the flat mass of dubbing over in the screen and press out the water on a towel.
I used the window screen because it was super easy to press out excess water. Just fold the flat mass of dubbing over in the screen and press out the water on a towel.

Step 6. Dry It Out
With the excess water removed, you want to dry out the mass of damp hair. The window screen was nice because I just opened it, and placed it somewhere to dry.
I raised it up so air could flow underneath, and lowered a lamp bulb near the mess to add warmth. It took about an hour or so to dry.

Check on it once in a while and break it up so it evenly dries. When its fully dry, it'll look something like lumpy felt. The chunks of dubbing can then be easily mixed around and broken up into one big wad.
NOTE - If you have a significant other, I suggest you keep this job on the down-low; maybe do it outside.
Unless he or she is also a keen fly angler, cutting up, clipping, and washing the hair from dead rabbit faces in the kitchen or bathroom is unlikely to get you many points.
The Results
Once complete, you get a nice heap of spiky dubbing.
Once complete, you get a nice heap of spiky dubbing.

Really, I'm still surprised just how much hair is on a rabbits face. The stuff is a reliable, uniform shade, with guard hairs and softer fur evenly spread out among the whole.
The mask I used was natural, and undyed, so the dubbing is a brownish-gray overall. I'd call it a “universal” color.
A light colored one would make a good companion to this. You can also mix and blend these dubbings at the vise, of course, for unlimited combinations.
I'll add a little sparkle dub, or finely shredded ultra flashabou, like 'Gartside Secret Stuff,' to get highlights in it. Or how about some orange muskrat, or yellow wool for other variations?

I can also imagine having hares mask dubbings in several dyed shades, representing the insects that are prominent in your locale. For me, this would be olive, yellow, and orange.
Who knows, one might even become a hares mask collector, snatching up all you find for that oh-so-subtle difference.
Hey, there's nothing wrong with that.
Hey, there's nothing wrong with that.
But, I'd keep it to myself... most people probably won't get it.
Tight Lines and Thanks,
Tight Lines and Thanks,
David
Previously posted on Palmetto Fly N Fish
Thanks to Steve Bird for the inspiration
No comments:
Post a Comment
Comments are moderated